JohnBeckett (talk | contribs) (tweak and comment with related tips) |
m (Undo revision 39040 by 94.71.153.21 (talk)) Tag: sourceedit |
||
| (19 intermediate revisions by 8 users not shown) | |||
| Line 1: | Line 1: | ||
| + | {{TipNew |
||
| − | One of the ways to work with several files in Vim is the use of buffers. |
||
| + | |id=1663 |
||
| + | |previous=1662 |
||
| + | |next=1664 |
||
| + | |created=August 30, 2010 |
||
| + | |complexity=basic |
||
| + | |author= |
||
| + | |version=7.0 |
||
| + | |subpage=/201008 |
||
| + | |category1=Getting started |
||
| + | |category2= |
||
| + | }} |
||
| + | A buffer is an area of Vim's memory used to hold text read from a file. In addition, an empty buffer with no associated file can be created to allow the entry of text. |
||
| + | The <code>:e ''filename''</code> command can edit an existing file or a new file. When a file is edited, the file is read into a new buffer that holds a temporary copy of the file (or an empty buffer for a new file). Editing makes changes to the buffer. To save a file, the original file is replaced by writing the buffer to disk. |
||
| − | Each file is automatically assigned to a buffer and you can create a new buffer with a new or existing file with |
||
| − | <tt>:e filename</tt> |
||
| + | The <code>:new</code> command creates a new window displaying the contents of a new (empty) buffer. |
||
| ⚫ | |||
| ⚫ | |||
| ⚫ | |||
| + | |||
| ⚫ | |||
| + | |||
| + | ==Overview== |
||
| + | [[File:tabs-windows-buffers.png|frame|left]] |
||
| + | {{clear}} |
||
| + | The image shows a session of Vim created with these steps: |
||
| + | {| class="cleartable" |
||
| + | | <code>gvim scan.py</code> || start GUI Vim editing file scan.py in first tab |
||
| + | |- |
||
| + | | <code>:tabe example.txt</code> || edit file example.txt in a new tab |
||
| + | |- |
||
| + | | <code>:vimgrep /0$/ example.txt</code> || search for lines ending with 0 in file example.txt |
||
| + | |- |
||
| + | | <code>:cwin</code> || open quickfix window (window 4) |
||
| + | |- |
||
| + | | <code>Ctrl-W w</code> || move cursor to other window |
||
| + | |- |
||
| + | | <code>:vsp</code> || split window vertically (windows 2 and 3 showing example.txt) |
||
| + | |- |
||
| + | | <code>:help quickfix</code> || open help (window 1) |
||
| + | |- |
||
| + | | (commands not shown) || scroll and size each window |
||
| + | |} |
||
| + | |||
| + | In the image, the label for the current tab shows <code>4 example.txt</code> because there are four windows in the tab, and the cursor is in window 3 which shows the buffer for file <code>example.txt</code>. This label results from the default setting of <code>'guitablabel'</code>; see [[Show tab number in your tab line|here]] for an example of changing the default. |
||
==Working with buffers== |
==Working with buffers== |
||
| − | The |
+ | The commands <code>:bnext</code> and <code>:bprev</code> allow changing between buffers, but are not convenient. They can be shortened to <code>:bn</code> and <code>:bp</code> respectively. |
| + | The <code>:b</code> command can also accept either a number or a string argument specifying which buffer to display. The buffers are numbered as they are created and can be viewed in a list using <code>:buffers</code>. Supplying a number after <code>:b</code> brings up that buffer e.g. <code>:b2</code>. Or if you have already typed <code>:buffers</code>, you can just type the appropriate number after seeing the list. |
||
| − | In case of a number, the buffer with this number is displayed. In case of a string, the buffer with a matching filename is displayed. |
||
| + | If a string is supplied, the buffer with a matching file name is displayed. You do not need to write the full name of the file as the best match will be used. After typing the first couple of characters, you can press Tab for completion of the name. For example, if a buffer is named example.txt, typing <code>:b ex</code> and pressing Enter will switch to the example.txt buffer, providing no other buffer matches "ex". If the command fails (because more than one buffer matches), press <code>:</code> then Up arrow to recall the command, then press Tab to choose the wanted name. |
||
| − | You don't need to write the full name of the file. Vim will fetch the best match for you. And you can also press Tab to let Vim complete a filename. |
||
==Jumping around== |
==Jumping around== |
||
| − | Vim keeps a history of all the jumps you make in your buffers. You can go to any place you jumped from with the |
+ | Vim keeps a history of all the jumps you make in your buffers. You can go to any place you jumped from with the Ctrl-O and Ctrl-I command (normal mode). This also works across buffers. |
| − | To toggle between the current and the last buffer use the ^ |
+ | To toggle between the current and the last buffer use the Ctrl-^ (normal mode) command (on most keyboards, hold down Ctrl and press the 6 key on the main keyboard). |
==Splits== |
==Splits== |
||
| − | You can use < |
+ | You can use <code>:split</code> and <code>:vsplit</code> to divide the current area into two windows with the same buffer. If you supply an argument then one of the new windows is created with the argument as a file name used for the buffer in the new window |
| + | To gain more control over how the splits are created, you can combine the <code>:vertical</code>, <code>:leftabove</code> and <code>:rightbelow</code> commands. Also of use are the the <code>:sfind</code> and <code>:sb</code> commands. |
||
| ⚫ | |||
| − | Buffers are *the* way to manage multiple files within a project in Vim. If you are managing multiple projects, consider opening a separate Vim for each project. |
||
| + | ===Examples=== |
||
| ⚫ | |||
| + | ;<code>:vertical sb 3</code> |
||
| − | <pre> |
||
| + | :Create a vertical split and show buffer number 3 in the window to the left. |
||
| − | :ls |
||
| − | :b # |
||
| − | :b <partial> |
||
| − | </pre> |
||
| + | ;<code>:vertical rightbelow sfind file.txt</code> |
||
| ⚫ | |||
| + | :Create a vertical split and read file.txt into the buffer in the right window. |
||
| + | ;<code>:rightbelow sfind file.txt</code> |
||
| − | The <tt>:b #</tt> command takes a buffer number (available from the <tt>:ls</tt> command) |
||
| + | :Create a horizontal split and read file.txt into the buffer in the bottom window. |
||
| + | ===Navigating splits=== |
||
| − | The <tt>:b <partial></tt> command takes a file partial based on the current file names loaded in your Vim session. If you press Enter on a unique partial, then Vim will do the Right Thing. You can also press Tab for expansion on partial names. |
||
| + | Use Ctrl-W followed by one of the <code>hjkl</code> movement keys. |
||
| ⚫ | |||
| − | This form of buffer navigation is far more efficient than using <tt>:bp</tt> and <tt>:bn</tt> |
||
| + | Buffers are a convenient way to manage multiple files within a project in Vim. If you are managing multiple projects, consider opening a separate Vim for each project. This way each Vim instance contains only related buffers in the buffer list. This is an advantage over other methods for managing multiple files; such as a combination of buffers, [[:Category:Split windows|windows]], and [[:Category:Tabs|tabs]]. |
||
| ⚫ | |||
| ⚫ | |||
| + | {| class="cleartable" |
||
| − | Thanks for this new tip. Now we have to wonder how best to manage this information with the following existing tips: |
||
| ⚫ | |||
| + | |- |
||
| + | | <code>:b <number></code> || Display the buffer with the given number. |
||
| + | |- |
||
| + | | <code>:b <partial></code> || Display the first buffer matching the partial name (or press Tab for name completion). |
||
| + | |- |
||
| + | | <code>:bd</code> || Delete the current buffer; will fail if unsaved (nothing is deleted). |
||
| + | |- |
||
| + | | <code>:bd!</code> || Delete the current buffer; will discard any changes (changes are lost). |
||
| + | |} |
||
| + | |||
| + | There are many plugins for managing buffers, but it is often easier to just use the above commands. Enter <code>:ls</code> to list the buffers, then (while the list is still displayed), enter a command like <code>:b12</code> to display buffer 12 (no space is needed). |
||
| + | |||
| + | ==See also== |
||
*[[Easier buffer switching]] |
*[[Easier buffer switching]] |
||
*[[Vim buffer FAQ]] |
*[[Vim buffer FAQ]] |
||
| + | |||
| − | The FAQ contains too many words, but has some good info. The buffer switching tip is in good shape. I have tweaked this new tip but haven't thought about it yet. Perhaps some merging would be in order. BTW if you register an account you will see less ads. [[User:JohnBeckett|JohnBeckett]] 10:45, August 30, 2010 (UTC) |
||
| ⚫ | |||
Revision as of 22:19, 17 April 2016
A buffer is an area of Vim's memory used to hold text read from a file. In addition, an empty buffer with no associated file can be created to allow the entry of text.
The :e filename command can edit an existing file or a new file. When a file is edited, the file is read into a new buffer that holds a temporary copy of the file (or an empty buffer for a new file). Editing makes changes to the buffer. To save a file, the original file is replaced by writing the buffer to disk.
The :new command creates a new window displaying the contents of a new (empty) buffer.
To list all buffers use the :ls command. Each buffer is assigned a number that is displayed in the first column.
The second column describes the state of the buffer. The different states are explained at :help :ls. The third column is the file name associated with the buffer.
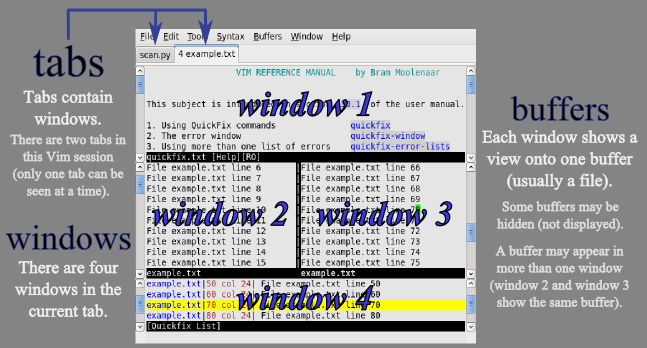
Overview
The image shows a session of Vim created with these steps:
gvim scan.py |
start GUI Vim editing file scan.py in first tab |
:tabe example.txt |
edit file example.txt in a new tab |
:vimgrep /0$/ example.txt |
search for lines ending with 0 in file example.txt |
:cwin |
open quickfix window (window 4) |
Ctrl-W w |
move cursor to other window |
:vsp |
split window vertically (windows 2 and 3 showing example.txt) |
:help quickfix |
open help (window 1) |
| (commands not shown) | scroll and size each window |
In the image, the label for the current tab shows 4 example.txt because there are four windows in the tab, and the cursor is in window 3 which shows the buffer for file example.txt. This label results from the default setting of 'guitablabel'; see here for an example of changing the default.
Working with buffers
The commands :bnext and :bprev allow changing between buffers, but are not convenient. They can be shortened to :bn and :bp respectively.
The :b command can also accept either a number or a string argument specifying which buffer to display. The buffers are numbered as they are created and can be viewed in a list using :buffers. Supplying a number after :b brings up that buffer e.g. :b2. Or if you have already typed :buffers, you can just type the appropriate number after seeing the list.
If a string is supplied, the buffer with a matching file name is displayed. You do not need to write the full name of the file as the best match will be used. After typing the first couple of characters, you can press Tab for completion of the name. For example, if a buffer is named example.txt, typing :b ex and pressing Enter will switch to the example.txt buffer, providing no other buffer matches "ex". If the command fails (because more than one buffer matches), press : then Up arrow to recall the command, then press Tab to choose the wanted name.
Jumping around
Vim keeps a history of all the jumps you make in your buffers. You can go to any place you jumped from with the Ctrl-O and Ctrl-I command (normal mode). This also works across buffers.
To toggle between the current and the last buffer use the Ctrl-^ (normal mode) command (on most keyboards, hold down Ctrl and press the 6 key on the main keyboard).
Splits
You can use :split and :vsplit to divide the current area into two windows with the same buffer. If you supply an argument then one of the new windows is created with the argument as a file name used for the buffer in the new window
To gain more control over how the splits are created, you can combine the :vertical, :leftabove and :rightbelow commands. Also of use are the the :sfind and :sb commands.
Examples
:vertical sb 3- Create a vertical split and show buffer number 3 in the window to the left.
:vertical rightbelow sfind file.txt- Create a vertical split and read file.txt into the buffer in the right window.
:rightbelow sfind file.txt- Create a horizontal split and read file.txt into the buffer in the bottom window.
Use Ctrl-W followed by one of the hjkl movement keys.
Managing buffers
Buffers are a convenient way to manage multiple files within a project in Vim. If you are managing multiple projects, consider opening a separate Vim for each project. This way each Vim instance contains only related buffers in the buffer list. This is an advantage over other methods for managing multiple files; such as a combination of buffers, windows, and tabs.
Here are the essential buffer commands:
:ls |
List the current buffers (including their numbers). |
:b <number> |
Display the buffer with the given number. |
:b <partial> |
Display the first buffer matching the partial name (or press Tab for name completion). |
:bd |
Delete the current buffer; will fail if unsaved (nothing is deleted). |
:bd! |
Delete the current buffer; will discard any changes (changes are lost). |
There are many plugins for managing buffers, but it is often easier to just use the above commands. Enter :ls to list the buffers, then (while the list is still displayed), enter a command like :b12 to display buffer 12 (no space is needed).